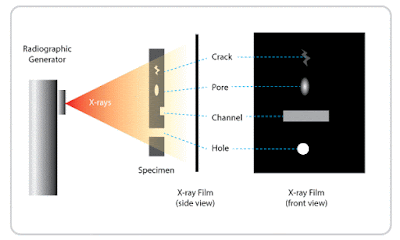
Radiography technique is based on exposing the components to short wavelength radiations in the form of X-Rays, Gamma rays and radio-isotope welds. This method is used to check internal cracks, shrinkage cavities, slag inclusions, defects in materials and welds. These defects are of special importance designed to withstand high temperature and pressure employed in power plants, atomic reactors, pressure vessels and oil refining equipment; because they cause stress concentration which may frequently lead to part failure. Nowadays, radiography techniques are finding more extensive applications in the field of physical metallurgy and in the treatment of various diseases.
Rays are absorbed by the materials through which they are passed in the proportion of their density. The rays, after passing through the components, show a picture on a fluorescent screen or on a photographic plate. The cracks, blow holes and cavities appear lighter, where as inclusions of impurities appear darker than the metal component. Developed photographic film show lighter and darker areas to represent the radiograph of defects in the component.
In X-Ray radiography, the portion of the casting where defects are suspected is exposed to X-Rays emitted from the X-ray tube. A cassette containing X-ray film is placed behind and in contact with the casting perpendicular to rays. X-rays after allowing through the blow hole in a casting, will be absorbed to lesser extent than X-rays which allowed to pass through sound metal, therefore, film appears to be more dark where defects are in line of X-ray beam. The exposed and developed X-ray film showing light and dark areas is termed as Radiograph. X-rays are useful only for small thickness material as their penetration power is less than that of gamma rays.

No comments:
Post a Comment